
Beyond the Glow: A Guide to Blue Hour Magic
- stensonstudio

- Mar 15
- 4 min read

If Golden Hour is the world’s way of showing off with a warm, fiery hug, then Blue Hour is the world’s way of taking a deep, calm breath.
In my previous post about Golden Hour, we explored that fleeting, honey-colored light that makes everything look like a dream. But if you pack up your camera as soon as the sun dips below the horizon, you’re missing the "secret" second act.
Welcome to the Blue Hour.
What exactly is Blue Hour?
Despite the name, it rarely lasts a full sixty minutes. Blue Hour is the period of twilight when the sun is between 4° and 8° below the horizon. Because the sun isn't hitting the earth directly, the atmosphere filters out the warmer red wavelengths, leaving behind deep, velvety indigos and violets.
It is a time of extreme stillness. At Stenson Studio, we believe this is the perfect moment to practice a bit of mindfulness. It gives you permission to be still and wait for the light to settle.
Quick Start Guide
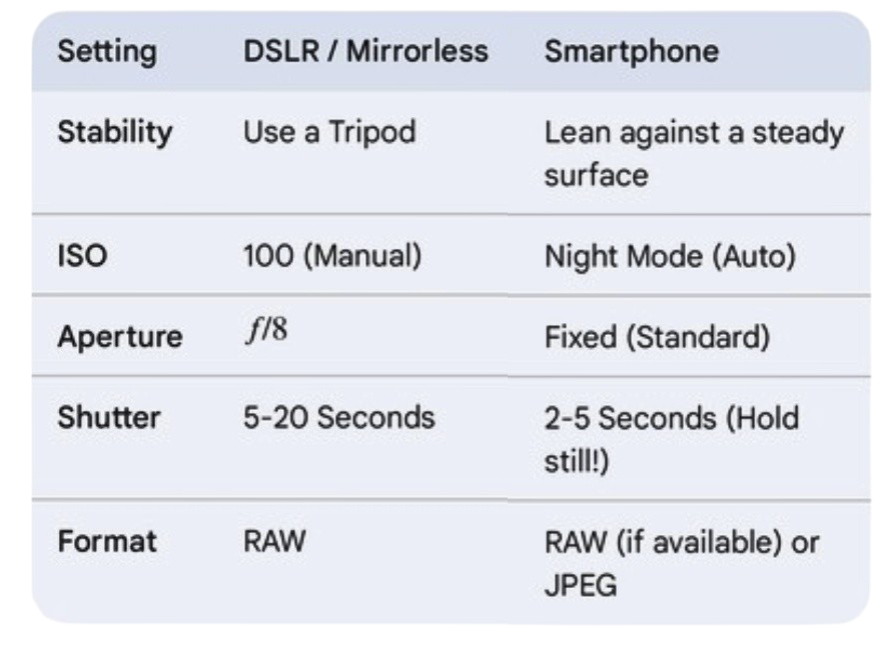
The Technical Deep Dive: DSLR & Mirrorless

Because we are working with much less light than during the day, your camera needs a little extra help. Here is how to dial in your settings for that crisp, professional look:
1. Embrace "Manual" (The Exposure Triangle)
To get that perfect blue, you’ll want to take control of three things:
* ISO: Keep this as low as possible (usually ISO 100 or 200). High ISOs can make your photos look "grainy," especially in those dark blue sky gradients.
* Aperture: If you’re shooting a landscape or a city scene, try a mid-range aperture like f/8 to f/11. This ensures everything stays sharp.
* Shutter Speed: This is the "magic" setting. Since your ISO is low, your shutter needs to stay open longer—often between 2 and 30 seconds. A tripod is essential here!
2. Shoot in RAW
If your camera allows it, switch your file format to RAW. Unlike a standard JPEG, a RAW file captures all the data the sensor sees. This allows you to "bring back" details in the dark shadows or tone down a bright streetlamp later during editing without losing quality.
3. Mastering Focus in the Dark
In low light, your camera’s "Autofocus" might start "hunting." Find a bright point of light (like a distant streetlamp), focus on that, and then switch your lens to Manual Focus so it stays locked in place.
Blue Hour in Your Pocket: Smartphone Tips
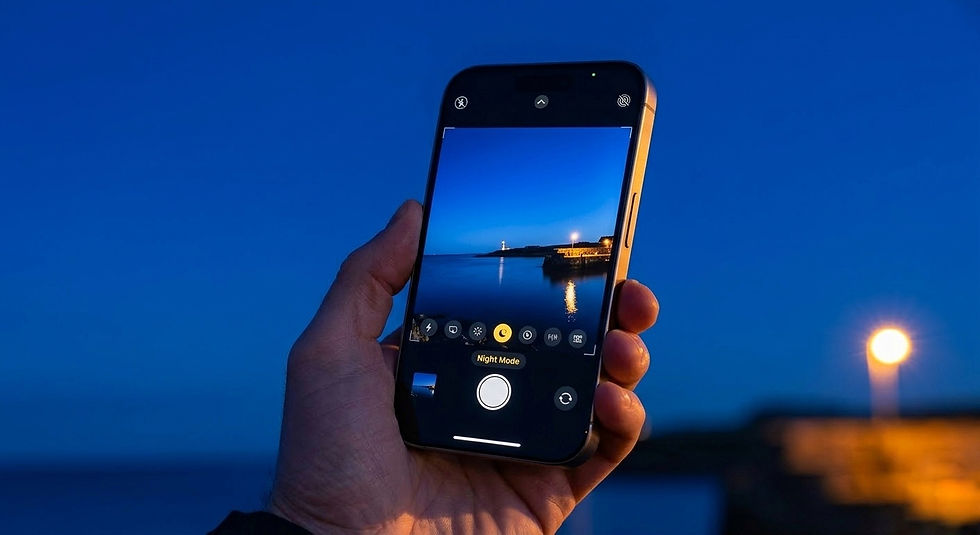
Photography should be for everyone, and modern smartphones are actually Blue Hour powerhouses. You don’t need a heavy camera bag to capture the mood.
For iPhone Users
* Night Mode: When the light drops, a little yellow moon icon appears. If you put your iPhone on a tripod (or lean it against a rock), Night Mode will often allow you to extend the timer up to 30 seconds for an incredibly clear shot.
* Long Exposure: Take a "Live Photo" of a scene with moving car lights. Afterward, open the photo in your gallery, tap the "Live" menu, and select Long Exposure. It will turn those moving lights into beautiful, creamy streaks.
For Android Users
* Explore "Pro" Mode: Many Android phones (like Samsung or Pixel) have a "Pro" or "Manual" mode. This lets you manually set your ISO to 100 and your Shutter Speed to a few seconds, just like a professional camera.
* Night Sight: Android’s Night Sight is world-class at pulling detail out of the shadows. Just remember to hold as still as possible while the "circle" completes its turn.
> Pro Tip for Everyone: Tap on a bright light on your screen and slide the brightness sun icon down. This keeps the sky looking like a deep indigo rather than a bright, grainy grey.
Composition & Contrast
The secret to a great Blue Hour photo is the "Blue-Gold" contrast.
* Look for Warm Accents: A house with a warm light in the window or a yellow streetlamp creates a beautiful "pop" against the cool blue sky.
* Leading Lines: Use the glow of a wet road or a line of streetlights to lead the viewer's eye through the frame.
A Mindful Moment

While your camera is on the tripod or leaning against a fence doing the hard work of a 10-second exposure, take a second for yourself.
Take a deep breath. Now take one more. Notice how the sounds of the day change as the light fades. There are no mistakes in photography, only new directions. If a shot comes out too dark, just adjust and try again. Enjoy this time—it’s just for you.
What are you grateful for in this moment?
Whether you are using a professional rig or the phone you’ve had for three years, the goal is the same: to capture a moment of peace.
What about you? Do you prefer the energetic glow of the morning or the quiet peace of the twilight? I’d love to see your Blue Hour captures—share them in the comments below!


Comments